DIY: How to build a chicken coop in one day for less than $100
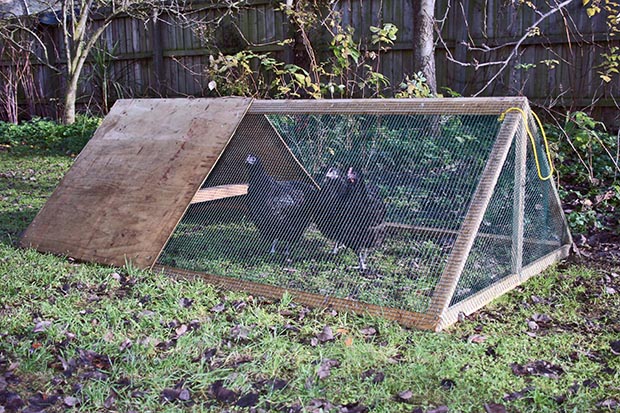
This step-by-step guide shows just how easy it is to build a basic chicken run for under $100 in less than a day.
Words: Marina Steinke
This ark is ideal for:
- 3 to 4 laying hens
- A breeding group of bantams
- A breeding trio of most light breeds
- A broody hen with her chicks
- A group of young chickens that need protection before they can join the main flock
- Isolating a sick bird
- Locking up a bullying bird
- For breaking in a new veggie patch (just position over a bed you want cleared out and let your flock do the work)
The outside measurements of the finished ark are 2.1m long, 1.27m wide at the base and 0.65m high. The angles are either 90 degrees or 45 degrees for maximum stability and ease of construction.
THE SHOPPING LIST
- 1 sheet of treated plywood, 2.4m x 1.2m, 7mm thick (shop around as prices vary)
- 4 x 4.8m lengths of treated dressed timber, 20mm thick by 45mm wide approximately
- 5m roll (3.2m minimum) of chicken wire, 900mm high with 13mm holes, or similar
- 2 hinges
- 2 screw eyes
- 6 small bolts with washers and nuts for the hinges
- staples
- screws (preferably) or nails, 20mm, 50mm and 60mm long approximately
- one metre of rope (optional)
- latch or brick to keep the flap door shut
TOOLS REQUIRED
- drill
- screw bit for drill
- staple gun or hammer tacker
- hammer
- jigsaw or circular saw
- handsaw
- wire cutter
- measuring tape
1. Cut two 900mm x 900mm sheets of plywood, four 2.1m lengths of dressed timber and two 900mm x 1.25m pieces of chicken wire. Arrange the timber lengths, the chicken wire and the plywood according to photo 1a, screw the plywood to the timber and staple the chicken wire to the timber (from the outside) and plywood (from the inside).
1a.
Note that the second plywood sheet overlaps the timber length by 32mm at the top end to allow for a neat finish (see detail, 1b). Cut four lengths of the timber (approximately 790mm long) to fit the 2.1m long rails at either end. Screw/staple them to the plywood/chicken wire and secure them with a 60mm screw, top and bottom.
1b. Note: 33mm overlap.
2. Cut two 1.23m lengths of timber with 45 degree angles at both ends. Preferably a second person should assist with the following step: arrange both roof sections as per detail in 1b and screw them together at the ridge. The 1.23m lengths should now fit in neatly at ground level.
2.
Secure together with screws. Cut a piece of timber that fits into the centre of the triangle and secure it with a couple of screws 2a. Staple chicken wire to the timber. Thread a rope through the chicken wire and under the ridge beams for easy transport.
3. Cut one 1.09m length and one 310mm length of timber with 45-degree angles on both ends. Cut two 225mm lengths with a 45-degree angle on one end each and fit them to the frame to provide the framework for the flap door. Cut three triangles from the plywood plus a piece that covers the bottom gap so that about half the width of the framing for the flap door is left exposed.
3.
Screw the plywood to the timber frame to only leave an opening for the flap door. Alternatively, cut a triangle to fit the whole back of the coop, then cut it up into pieces as above.
4. Cut a cardboard template for the flap door to make sure that the door will fit snugly. Allow enough space for attaching the hinges. Cut the plywood according to the shape of the template. Stiffen the plywood with a couple of timber off-cuts, making sure that the stiffeners don’t overlap with the framework. Use the small bolts with washers and nuts to fasten the hinges to the flap door. Fit the flap door to the chicken ark and secure with screws.
4.
5. Drill two holes for the screw eyes into the framing timber a few centimetres above the flap door. Fit the screw eyes and thread a piece of rope through them. The basic chicken run is now finished. We use a brick to keep the flap door shut but a latch is a good option, too. Food and drink containers may be tied to the screw eyes too.
5.
6. If desired, the covered part can be fitted with a roost. It is easy to turn the run onto its side so that the inside can be conveniently accessed. We used a 7cm wide piece of dressed timber with rounded edges as a roost. The ends have 45-degree angles and two screws per side through the plywood into the roost hold it in place.
6.
ADVANTAGES
✔ Low cost – less than $100 for all new materials.
✔ Light weight – can easily be moved sideways by 1 person using just 1 finger.
✔ Easy and quick to build without special building knowledge
✔ Durable
✔ Can be built within 4-5 hours once all materials have been obtained
DISADVANTAGES
✘ Retrieval of eggs and servicing the water and feed containers requires kneeling or crouching down
✘A net is necessary to catch the chooks during the day
✘In an exposed position it might get blown over in high winds due to its light weight
✘With a run so quick and easy to build, keeping poultry might become an addiction!
MAKE A NEST BOX
An optional nesting box can be made by using a piece of plywood (approximately 350mm x 450mm) as a base, and a thick fence paling.
We used three pieces of a 25mm thick and 150mm wide fence paling, 2 x 450mm long and 1 x 300mm long, plus a 350mm x 160mm piece of plywood (or you can use another 300mm long piece of paling).
The paling timber is quite heavy which ensures that the birds can’t move the nesting box around. As the covered section of the run is quite dark, this nesting box, lined with straw or wood shavings, provides a cosy place for hens to lay. Position the nesting box in one corner under the roof (but not under the roost) so that the eggs can be collected by just reaching into the ark.
