How busy worms can turn a profit (or at least, a lot of good compost)
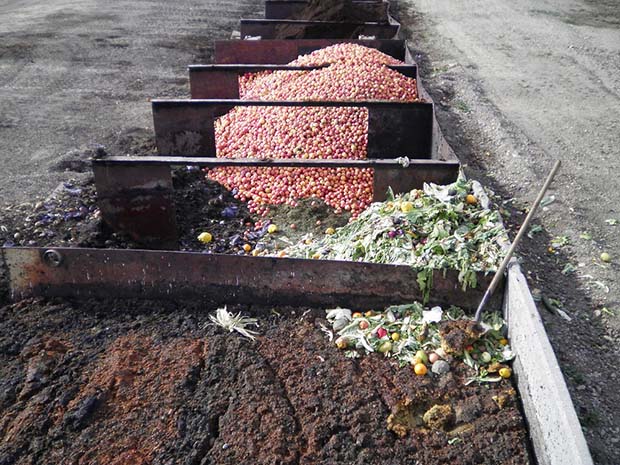
Food bins at the Central Wormworx farm.
All the waste products that leave the rear end of your animals or that you throw into your compost have the potential to make you good money.
Words: Nadene Hall Photos: Robbie Dick
Manure happens when you have livestock, and walking around it is about the closest most of us come to contemplating the mix of fibre and nitrogen that is left to rot into the ground.
Horse owners have the most visible problem and it has a knock-on effect: horses won’t graze within a certain distance of their own manure, and it’s poop that takes up a lot of space. Eventually, you can run out of space, so many owners choose to pick it up and dump it in big piles. If they’re really enthusiastic, they might bag it and sell it.
But when worm farmer Robbie Dick sees a big pile of manure, he doesn’t see a waste product; he sees the potential for profit, and he thinks a lot of lifestyle block owners could make a sweet little profit out of all that sh*t.
“Lots of lifestyle block owners have pets and animals like horses and if they collected that manure and fed it to worms they could then use it to grow something profitable like export flowers or pumpkin or melon varieties.
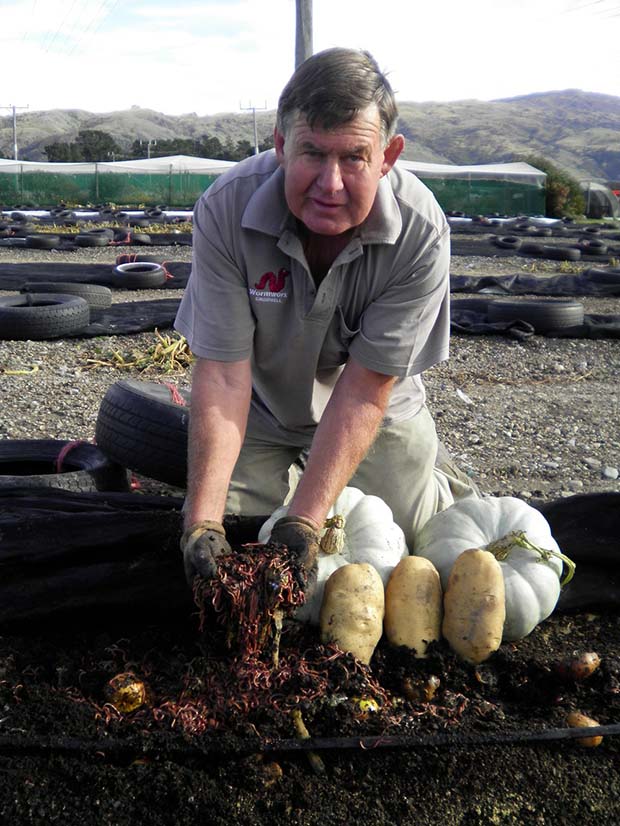
“We’ve had great success with pumpkins - we’ve just finished (in late April) picking up trailer loads of (self-seeded) pumpkins that were growing alongside our worm farm. You can get up to 30 pumpkins off one plant and sell them at 90c per kilo, but we’ve had even better returns from (self-seeded) honeydew and rock melons which sell for twice the price.”
Robbie has heard of another grower who used waste fruit to create worm farm windrows in his tunnel house.
“He put the worms in the windrows, covered them with polythene, and planted tomatoes through the top. He was getting rid of that waste and growing a crop of tomatoes. He proved it could work as worms tend to like it when it’s warm (mid-20s) and a lot of the time you can’t get that through colder conditions.”
Creating a worm windrow is pretty simple. Put your manure and/or other waste products like fruit, cardboard, and handfuls of lawn clippings* in a pile on a site with a slight slope, directly down onto the ground. It should have a base of about 1.5m and come up to an apex about half a metre high. There’s simple maths behind why that particular size and shape is a good idea says Robbie.
“That means you can use a 2m wide cover – most covers or plastic you can buy is 2m wide – or you can use old carpet and cut it into 2m wide strips which is also very good.
“You want to make sure there’s no ponding if you get a lot of rain so you want a gentle slope with the windrow running up and down the slope.”
The only ‘flash’ technology you need is irrigation. Robbie likes the leaky pipe type which is laid along the apex of the windrow under the covers. This is important not just for moisture but also for regulating the temperature. “Most food has got a lot of moisture in so (a heap) can start to heat up.
You need a soil temperature gauge (to make sure it stays around 16°C) to start with but after a while you can often tell just by putting your hands on it. “The worms are good indicators too; if they’re trying to get out, something is heating up, but add some water along the top and it will come right pretty quickly.”
The danger time is the first three days or so after you added new material. Once the worms have eaten the ‘combustible’ stuff the temperature of a windrow tends to stabilise.
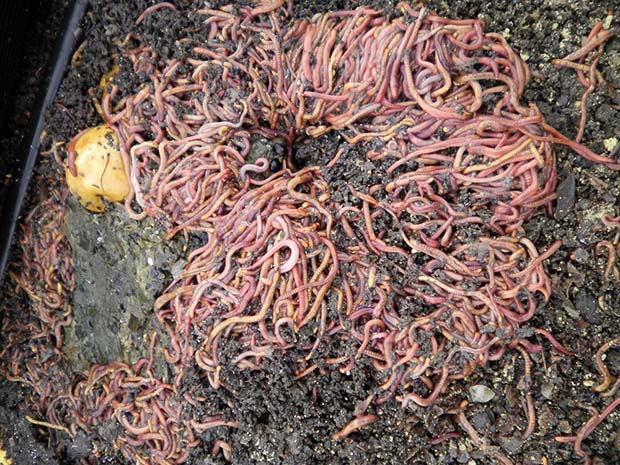
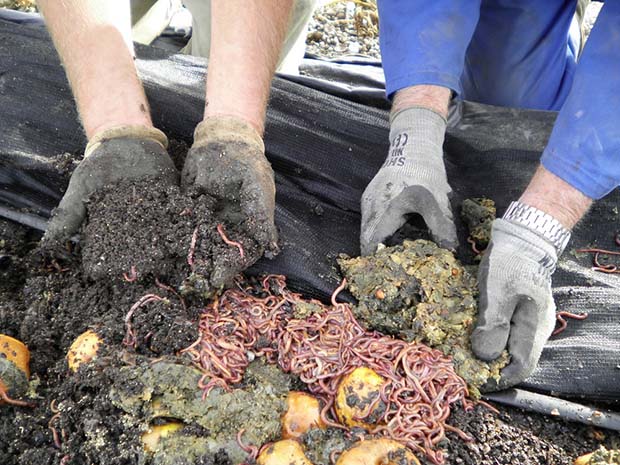
Tiger worms can be added to one end of the pile - about 1.5kg of worms for every metre of windrow will take about 8 weeks to process it - and you can add more manure/waste to the other end. The worms will slowly move along as they need food, leaving their castings behind, and once they get an idea of how much food is about, they regulate their breeding so they don’t over-populate it.
“The other option is to build a windrow of a certain length, then start feeding down one side of it – the worms will move over into the new food and you can shovel out the worm castings or start growing something on the other.”
Worms need to stay warm which is why a cover is useful. Robbie uses whatever is easily available (usually free) and says you should think about it like you would your own bed. “Like, if carpet gets wet it does freeze, there’s not much insulation; if it’s dry it’s good. You put leaves on top, then plastic and it acts as a duvet when it gets wet.”
Once a windrow is empty of worms, the mix can be sifted to take out any ‘rough stuff’ as Kevin calls it.
“We use one of those old metal beds with the netting, it’s the ideal size. We sit it on top of a trailer, the good stuff drops onto the trailer and we just sort through it and put the rough stuff back into the windrows for another go.”
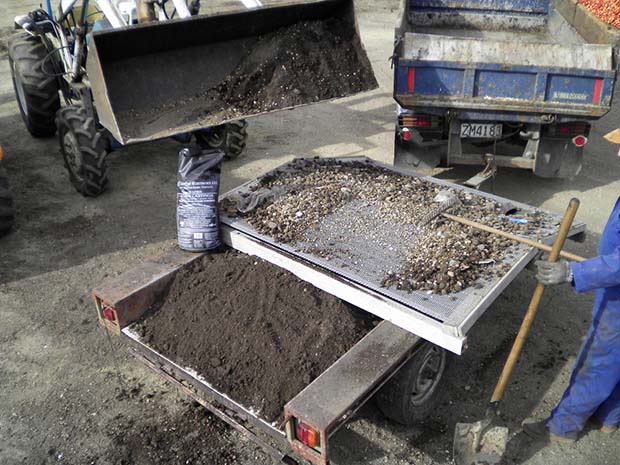
Screening the castings over the mesh base of an old bed.
MAKING THEIR WORMS WORK HARDER
When you have tens of millions of worms working for free and turning waste into a good living, you might think it was time to put your feet up and relax.
But Robbie and Rosanna Dick of Cromwell-based Central Wormworx felt their 80 million red ‘tiger’ worms weren’t doing enough just creating the castings from hundreds of tonnes of waste that comes in from local orchards and supermarkets (see NZ Lifestyle Block, August 2011), even though the product created sells for around $500 per cubic metre.
When the Dicks talk about growing pumpkins and other vegetables for sale, it’s because they’ve been there and done it themselves, making a nice little profit on the side.
But worm farming is the heart and soul of their business and they’re trying to spread the word as far as they can about the simplicity of the process as a recycling method.
When NZ Lifestyle Block magazine last spoke to the Dicks, there was talk of a new worm farm on a huge scale that would recycle much of Dunedin City’s rubbish.
“(They’re) looking at doing it inside a huge building; it’s in its early stages but I’ve been up to have a look three or four times and it’s quite exciting, it’s really going to take off.
“I’ve also had photos back from a Mt Cook (project) where they’ll do it on concrete pads but they will have electrical cable running through them so the worms don’t get cold.”
Another project that has continued to expand is the worm farm at the Ashburton abattoir. It used to pay to dump the ‘paunch grass’ (the partly digested grass left in the stomach of cattle after slaughter) but now uses its worm farm instead. Anyone who has seen a cow home-killed will know the paunch grass is pretty smelly but Robbie says the worms at the abattoir are so good at their job, you’d never know what they were eating.
“You can walk around (the windrows) in your street shoes, there’s no odour and it’s very tidy. It’s right on the outskirts of Ashburton, quite near the town too. Their windrows are about 200m long and there are six or seven of them. They use a feed-out wagon and it sits in the plant most of the day collecting paunch grass and cardboard, then when it’s full they feed it out along the windrows.
Robbie’s dream is that one day commercial dairy units will have worm farms alongside their milking sheds to process the dairy shed and feedlot waste.
“There’s so much of it around and they put it out on the paddocks in its raw state, then when it rains, what happens to it? It ends up in waterways. If they used worms, they could turn it into a dry material, then put it on when the ground conditions are suitable. We’ve put it through ‘bulkies’ (bulk spreader trucks) and it can even be blended with lime, you just use a freeing agent to make it run easier (through the spreader).”
The Central Wormworx windrow worms have had a taste of feedlot waste and they liked it. A 65m windrow took just two days to process it.
“It was just gone,” says Robbie. “We’re keen to get something happening, we’ve been talking to the Invermay Research Stations and Otago Polytech and the university and all see merit in what we’re trying to do.”

A blend of worm castings and compost delivered to an organic vineyard.
6 THINGS TO KNOW ABOUT BEING A PROFESSIONAL WORM FARMER
1. No bed required
There’s no need to put anything down on the soil before you start a windrow says Robbie. “Never put plastic down, or anything like that, you’ve got to let them breathe. When things cool down (the waste) might go anaerobic and you can kill them.”
2. No smell
Thousands of tonnes of waste products come into Robbie and Rosanna’s small block every day but there’s no smell when a windrow is working well – the worms are too quick to let anything go rotten – but if something does smell bad, it’s a warning sign. “If it smells bad, it’s bad for the worms,” says Robbie.
3. Know what a health worm looks like
A fat worm is a healthy worm. “One that’s not thriving is long and skinny and doesn’t have much get up and go,” says Robbie. “Worms that are in the right pH conditions get fatter – we’ve seen now after we cut off the (chlorine-dosed town supply) water during winter that the size of the worms seems to double. They put up with it but they like it a lot better when they get that (chlorine) water.”
4. Use lawn clippings as a dressing
Only ever put lawn clippings into a worm farm in handfuls or as a light, thin sprinkle, and don’t use clippings that have been treated with chemical sprays. “Lawn clippings can be extremely bad as they can generate a lot of heat. Put them on the windrow in small heaps (or handfuls) instead of as a continuous line. The worms attack them around the base but if it’s a continuous line of hot product, they might get in, get too hot and then be unable to get out. If you’re putting it on with a shovel, put out one shovel full, then leave a 300mm gap, then the next one.”
5. Be careful of manure containing drench
Don’t use manure from animals that have just been drenched. “There’s usually a withholding period of two months with drenches designed to kill off worms so ‘drench’ material should be stockpiled, but after that time (the chemicals) should have broken down.”
6.Give your worms a varied diet
“The more variety the better,” says Robbie. “The more variety, the better quality castings you get. Everybody’s got cardboard, shredded cardboard is very good, it’s just a matter of trying to find it.” centralwormworx.com
