The ultimate spring garden guide: All the vegetables to plant to kickstart your garden
Get a head start on summer and autumn crops by growing slow-growing seedlings indoors and in greenhouses Watch out for late frosts, though, which can destroy tender plants overnight
Words: Jane Wrigglesworth
Pumpkins/Squash
Nutrient Density Score: 33.82
Why they’re nutritious: Very high in vitamins A and C, with good levels of vitamins B2, E and folate.
Transplant/direct sow: Pumpkins and related winter squash (including butternuts and buttercups) are easy to grow. They simply need warming soil, sun and enough growing days to reach maturity. Direct sowing is the best option. In colder regions, sow indoors to ensure seedlings have enough time to reach maturity before the end of the season — transplant when the seedlings have two true leaves. The soil temperature must be 20°C or more for direct sowing or transplant.
Growing conditions: Pumpkins need full sun, well-draining soil and plenty of space for spreading vines, or a trellis they can climb up. Plant 4 to 5 seeds 2.5cm deep in mounded soil, with mounds 1.2m to 2m apart. Thin seedlings to 2 to 3 per mound when they reach 7cm to 8cm. Water well and consistently.
Growing tips: Pumpkins are heavy feeders and need plenty of organic matter, such as compost or sheep pellets. Pinch off the ends of each vine once a few pumpkins have formed to focus the plant’s energy on growing large fruits. For evenly shaped fruit, carefully turn the fruits every week or so. Pumpkins take up a lot of space, but vines will grow up trellises when secured with ties. Vines growing vertically will need slings to supply extra support to fruit that weighs more than 2kg. Make slings from an old tee-shirt or cheesecloth.
Days to harvest: Between 75 and 140.
Variety recommendations: ‘Gold Nugget’ (mini pumpkin), ‘Spaghetti Squash’ (spaghetti-like strands inside), ‘Marina di Chioggia’ (heirloom), ‘Queensland Blue’ (all-time favourite), ‘Small Sugar’ (excellent flavour).
Kumara
Nutrient density score: 10.51
Why it’s nutritious: Orange-fleshed kūmara are incredibly high in beta-carotene. Purple-fleshed kūmara are high in anthocyanins, which have antioxidant and anti-inflammatory properties. Both have high levels of vitamin C, and the B vitamins, B6, B5, B3, B2, B1 and biotin (B7).
Transplant/direct sow: Take cuttings.
Cuttings method 1. In September, dig a hole 25cm deep and add sand to the bottom (this can also be done in a bucket or container). Place one kūmara (can be shop-bought) on the sand, and cover with a half-half mix of sand and soil/potting mix. Shoots will grow. When these are 15cm high, lift out the whole kūmara and gently pull off the shoots. Place the shoots into a shallow dish of water to keep moist. Plant in a ‘J’ shape on mounds of soil on or after Labour Day. To achieve a ‘J’ shape, lay the rooted cutting flat and gently bend up the top end with foliage so it emerges out of the soil.
Cuttings method 2. To propagate a kūmara cutting, cut a mature, healthy kūmara in half. Place four toothpicks into the middle of the kūmara and place over the lip of a glass filled with water. In one to two weeks, green shoots will appear.
Growing conditions: Kūmara need light, sandy soil. Growing on 1m-wide mounds helps this. Mix sand and compost into the mounded soil.
Growing tips: As the plants grow and spread out, lift the foliage off the ground and fold it back onto itself. This prevents the plants from putting down more roots, which will take energy from developing tubers. Water until plants start growing, then ease up unless plants wilt in excessive summer heat.
Days to harvest: Between 120 and 150.
Variety recommendations: ‘Owairaka Red’ (traditional favourite), ‘Beauregard Orange’, ‘Purple Dawn’, ‘Sweet Tango’ (very sweet), ‘Paukena’ (New Zealand heritage).
Beetroot
Nutrient density score: 87.01 (greens only)
Why it’s nutritious: The roots contain betalains, which have antioxidant and anti-inflammatory properties. They also contain high levels of folate, manganese, copper, potassium and magnesium. The greens are an excellent source of lutein and zeaxanthin, which are good for eye health.
Transplant/direct sow: Best sown directly. Plants dislike root disturbance.
Germination: Soil must be at least 10°C, although 15°C is ideal.
Growing conditions: Beetroot is a quick-growing vegetable that survives frost and cold and is available in a variety of colours and sizes. Both the root and the greens are edible. Plant as soon as the soil temperature is high enough (in warm areas that might be year-round) in full sun and well-drained soil. Soil should not be overly fertile. Using compost or fertilizers with too much nitrogen will produce green tops at the expense of roots.
Growing tips: Seeds (actually seed clusters) can produce more than one seedling; thin plants when they reach 5cm to ensure enough space for roots to grow. Allow 7cm to 10cm between each plant. Cut off the greens from the root after harvesting to extend root storage time.
Days to harvest: Between 50 and 70.
Variety recommendations: ‘Detroit Dark Red’ (popular heirloom), ‘Chioggia’ (flesh has concentric rings of red and white), ‘Touchstone Gold’ (golden), ‘Baby’ (tender, baby size).
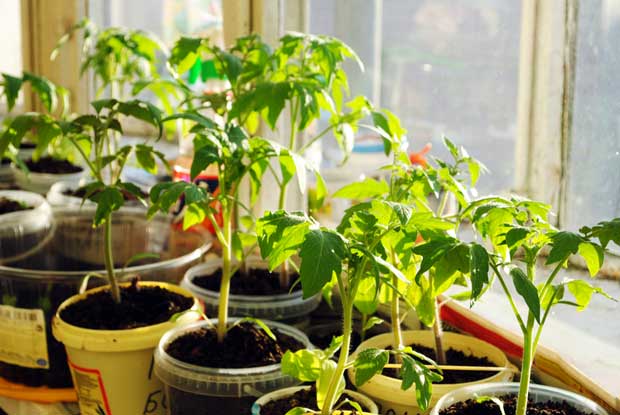
Tomatoes
Nutrient density score: 20.37
Why they’re nutritious: An excellent source of lycopene, an antioxidant linked to many health benefits, including reduced risk of cancer and heart disease. Also high in vitamins C and K and potassium.Transplant/direct sow: Start seeds indoors 6 to 8 weeks before the last frosts to get a head start in the garden. Growing conditions: Tomatoes are an excellent plant for beginner gardeners because they are fast-growing and produce a lot of fruit. And with so many sizes, shapes, types, and varieties, there are tomatoes to suit all taste buds. Plant seedlings about 10cm high in full sun in a well-drained location. Apply a general fertilizer while plants are young; once they begin to flower, switch to a specialist tomato fertilizer, which is high in potassium, to encourage continuous flowers and fruit.
Growing tips: Set up stakes or a tomato trellis while plants are still small to prevent damaging roots by putting up later. As plants grow, pinch off laterals (side stems), leaving just a few branches growing from the main stem. This encourages the plant to focus on growing fruit and not foliage. Remove all the lower leaves from the plant as it grows to prevent diseases from traveling up from the soil to the fruit.
Days to harvest: Between 75 and 85 days from transplant.
Recommended varieties: ‘Dr Walters Special’ (beefsteak type with low acid), ‘Big Rainbow’ (beefsteak type with red and orange streaks), ‘Indigo Blue Berries’ (prolific blue-black cherry tomato), ‘Albenga Oxheart’ (Italian heirloom), ‘Tumbling Tom’ (cocktail tomato ideal for hanging baskets), ‘Amish Yellowish Orange Oxheart’ (exceptionally high lycopene levels), ‘Sweet 100’ (abundant cherry tomato).
Capsicums
Why they’re nutritious: Extremely high in vitamin C. One cup of sliced raw red capsicum provides 157 per cent of the recommended daily intake. Good levels of vitamins A, B6, E and folate.
Transplant/direct sow: Start indoors 8 to 10 weeks before the last frosts to get a head start in the garden.
Germination: Slow to germinate and often with low germination rates; start more seedlings than needed.
Growing conditions: A long-season, warm-weather vegetable, capsicums can be finicky, but with the right growing conditions, they will thrive. Plants requre full sun and well-draining soil. Transplant seedlings when they reach 5cm to 7cm tall and the soil temperature is above 18°C. Growth is dependent on warm temperatures.
Growing tips: Young plants grow best when day temperatures are at least 18°C to 21°C with night temperatures above 15°C. If temperatures drop below 12°C, plants become stunted. Soil can be warmed up before transplanting by covering it with mulch for a few days. A cloche will help seedlings settle in in the early days, and a clear, plastic windbreak can warm up the immediate surroundings as plants grow. Feed as for tomatoes.
Days to harvest: Between 80 and 120 days from transplant.
Recommended varieties: ‘Bell’ (traditional), ‘Jingle Belles’ (mini capsicum), ‘Mamma Mia Rossa’ (sweet Italian grilling capsicum, long shape), ‘Alma Paprika’ (great for drying, grinding and using as paprika), ‘Sweet Chocolate’ (chocolate colour).
Globe Artichokes
Why they’re nutritious: Globe artichokes have excellent levels of folate, vitamins K and C, magnesium and potassium.
Transplant/direct sow: Start seeds indoors 6 to 8 weeks before the last frost. A long-growing season is necessary. Globe artichokes can also be grown from suckers from roots. Transplant seedlings when all risk of frosts has passed.
Growing conditions: Depending on the climate, artichokes can be grown as a perennial or annual and for their flowers as well as their fruits. In environments where they grow as perennials, they will last 4 to 6 years before being exhausted. Plants are deep-rooted. They like deep, humus-rich soil, so dig over the soil and add plenty of compost. A general fertilizer added to the soil a couple of weeks before planting is beneficial. After planting, apply blood and bone or a liquid fertilizer high in nitrogen. Do so again a fortnight later to get plants growing well. Plant in full sun.
Growing tips: Allow 90cm to 100cm space between plants. Plants grow up to 1.8m tall; if they are planted too close together, they will shade each other. Water often and consistently. Most varieties do not crop in their first year, though one recognized variety, ‘Imperial Star’, does. Harvest the large bud in the centre first and the plant will continue growing smaller side buds. For eating, harvest at bud stage, before the petals open. If left to bloom, artichokes will attract bumble bees and honeybees.
Days to harvest: Second year for most; approximately 170 days after harvest for ‘Imperial Star’.
Recommended varieties: ‘Green Globe’, ‘Imperial Star’ (first-year harvest), ‘Violetto Precoce’ (violet-coloured bud).
6 TASKS TO GET YOUR SPRING VEGGIE PATCH STARTED
1. Start warm-season vegetables such as tomatoes, capsicums, and chilli indoors or in greenhouses to get them off to an early start. In the meantime, prepare their outdoor beds.
Remove any weeds, dig over and apply compost, or a composted mixture of animal manure and sawdust. Add some wood ash or chopped up seaweed, both of which contain potassium, and dig in.
READ MORE: 20 expert tips to growing great tomatoes
2. Sow cabbages that do well in summer – I recommend the fast-growing, tender-leaved variety, Golden Acre – in compost-enriched, free-draining soil. Plant out two to three weeks before the last expected frost date. Mulch around them to regulate the soil temperature. If you have problems with white cabbage butterflies, erect netting, held up by hoops, to keep them out.
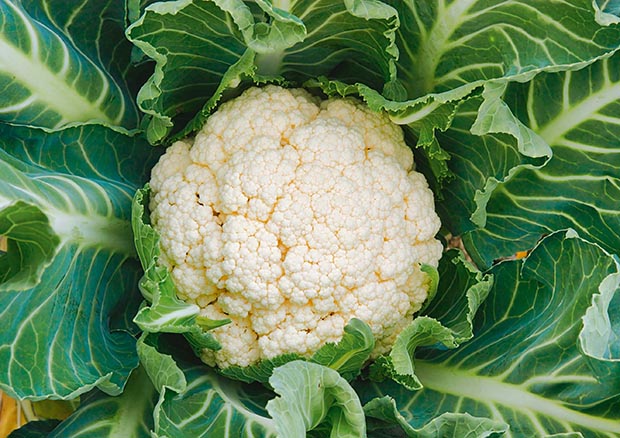
3. Sow broccoli and cauliflower seed in trays for planting out when the soil warms up. Phenomenal Early is a great cauliflower variety and will be ready for picking in four months. Cauliflowers are best grown quickly. If growth is checked (eg, not enough food or water), heads may be small, or they won’t form at all. I like a seaweed-based fertiliser. It has nitrogen, phosphorus, potassium, and micronutrients such as boron and molybdenum, which are essential for good cauliflower health.
4. Beetroot, carrots, parsnips, leeks, and turnips can be sown in trays for planting out later or sow directly under cloches.
5. Sow peas directly into garden beds. Peas will germinate in soil temperatures as low as 4°C, though a consistent temperature above 7°C is best. Before planting, dig in chopped up banana skins, which contain potassium and phosphoric acid. The soil does not need to be overly fertile, as legumes fix their own nitrogen in the soil.
6. If you didn’t sow main crop onions in autumn, you can do it now. They grow best in fairly cool temperatures when starting out, so if you’re in a warmer region, do it as early this month as possible. Sow under cloches, in trays for transplanting out, or plant seedlings. Onions like a light, well-drained soil containing a good deal of compost or aged manure.
MORE HERE
At home with Tāme Iti: Explore the vegetable gardens, sunflowers and art studio of a Tūhoe activist
