How this New Plymouth couple transformed a steep, wet block with earthworks
When you have enormous amounts of water moving over your block, good earthworks keep everything calm.
Words: Rachel Rose Images: Ross Nolly Additional images: GreenBridge
Who: Bena Denton & Daniel Woolley
What: driveway, building platform, drainage
Land: 4ha (10 acres)
Where: New Plymouth
Earthworks are all about dealing with water, says veteran digger driver Kevin Adamson. Earthworks must be shaped to shed water before its powerful erosive force can gather momentum. Shed water “little and often” is Kevin’s pithy advice. It’s not rocket science either, says sustainable home and landscaping consultant, and lifestyle block owner, Daniel Woolly.
“It’s common sense, but that seems to be increasingly uncommon. Conventional ways of managing water on roads, and in the landscapes, often see water as a problem to be offloaded and measures are taken to get it away someplace else as quickly as possible.”
READ MORE: Earthworks 101: Transforming a block with a digger
Bena Denton and Daniel Woolley set up GreenBridge to help other lifestyle block owners make good choices, from selecting their land, to evaluating best land use, landscape design, and implementation. Photo: Ross Nolly.
He believes in a different approach, based on best-practice permaculture design. It means creating a landscape where water travels over the longest path possible, on the lowest gradient, dispersing over the widest possible area.
Daniel and his wife Bena Denton have learned a lot from their own experience with the steep, wet, bare block they bought in 2011. Their house faces north and is tucked into the landscape to protect it from the area’s strong winds. It overlooks terraces and swales created to form a sheltered orchard space.
The couple has a lot of water to manage. Taranaki is known for its high rainfall, up to 2m a year. The house sits below the driveway, which enters the property at a low point in the road. It collects “crazy quantities” of runoff from their uphill neighbour.
Bare soil and heavy rain guarantees erosion. This doesn’t happen on Daniel and Bena’s property, thanks to effective earthworks that slow the water’s speed, and disperse it over a wide area.
Photo: GreenBridge.co.nz.
With two young children and a business they run from home, the couple wanted to be sure their driveway would be passable, no matter how heavy the rain.
Eight years and lots of learning later, Daniel says two principles stand out when it comes to protecting soil against erosion from water.
1. Design for failure.
2. Understand your levels.
To achieve this, Daniel likes to use water structures. These are earthworks that hold, move, infiltrate, and release water. On his block, it includes swales, level sills, drains, culverts, and soak holes. All of these structures will fail at some point, says Daniel.
Stacked culverts under the filter fabric work together during heavy rainfall.
“That’s not a problem if overland flow can be designed into the system. Even drier parts of the country are seeing more extreme storms; we need to create earthworks with the capacity to handle larger water inflows.”
Daniel and Bena’s driveway is a good example of designing redundancy into a system. The original was constructed by a major roading company, and you’d think that would be a good thing. No, says Daniel. “They were wildly incompetent, which was a great way for me to learn.”
In its second iteration, the driveway snakes along the land’s contour and has the lowest possible gradient, falling just 1.5m over its 180m length. Runoff from the neighbour’s property, above the driveway, is collected in an open soak hole that can hold 100,000 litres; it can fill after just an hour of heavy rain.
It empties through two culverts stacked on top of each other. The top culvert only starts working when the first is completely submerged or blocked.
- The koru-shaped swale in action. Note how calm and slow the water is by the time it heads over the wide, level sill.
- Compared to its speed coming out of the pipe, pictured here.
The culverts feed into what Daniel calls a ‘koru swale’, an ingenious water structure he designed (pictured above). The water falls from the culvert into the ‘round’ part of the koru. It hits still water, which dissipates the force. The now calmer water disperses through the wide ‘tail’ of the koru.
From there it gently flows over a level sill, down the hill. Constructing these earthworks took careful thought but no earthmoving machines. It was created mostly by hand.
“Before we built the koru swale, there would be deep erosion cuts every time it rained (pictured at left). Now there’s none,” says Daniel.
Filter fabric being installed on a ‘reverse speed hump’ on Daniel and Bena’s driveway.
Rainfall runs into a drain on the high side of the driveway. The two lowest areas of the driveway are the weak points, so Daniel created a 2m-wide, level sill to protect them. It’s like a reverse speed hump, slightly below the driveway’s surface and level along the downhill edge. It’s lined with filter fabric and covered with gravel.
The sill is another level of redundancy. If it was ever overwhelmed with rain, says Daniel, the water could only scour out the gravel because the earth base of the driveway is protected by the fabric. Another option would be to concrete this section, but it hasn’t proved necessary.
From the sill, water moves over the lip of the level spillway. The filter fabric – now covered in grass – extends over this lip and down to the bottom of the slope. The grass flattens out when large amounts of water move over it, springing back up and continuing to grow when it’s dry.
HOW TO BUILD A SWALE
Swales are a flat-bottomed ditch cut into a shallow or moderate slope (up to 17° is the oft-quoted maximum angle), with a mound on the downhill side of the swale.
The mound is planted, so the soil is held together by plant roots. In drier climates, that mound is a prime growing space for shrubs or trees as the swales direct water to the roots, and slow its progress.
There are a lot of simple swales on Daniel and Bena’s block, many of them dug by hand. Swales have been made famous by Australian permaculture teachers, but Daniel says they must be appropriate for the New Zealand context.
“The Australians focus on how to gather and infiltrate every drop of water because they don’t have enough of it. In Aotearoa, we often have the opposite problem: what do we do with the excess?”
Piling topsoil (and the grass/weeds growing in it) on top of original ground to form the berm risks creating a slip plane, warns Daniel. The risk varies according to soil type and the degree of slope. On steeper slopes, in heavier rainfall environments or if building larger swales, he recommends removing the topsoil and cutting a bench the width of the swale and the mound, before forming the mound.
A hand-built swale doing its job during heavy rain. Clumps of turf have been placed grass side up on the berm to establish cover quickly.
Don’t merely turn clumps of turf upside down to build up the mound. The grass or weeds will rot down, creating an unstable layer that can slip away when saturated, taking all the soil and plants above with it.
The mound shouldn’t be compacted tightly, because plant roots need to get established and water needs to soak in, but not too much.
“Don’t let water rise in the swale more than halfway up the mound. If the mound gets over-saturated, it will slip away,” Daniel says. “Knowing when to let a water structure overflow is critical.”
So is knowing where and how to overflow the excess water. Level sills and spillways onto original ground are a good option for emptying swales.
Daniel learned the hard way. During a storm, he watched as hand-dug swales – built to protect terraces in the orchard – failed. The water rose too high against the mound, and a section collapsed, creating a significant slip.
Fortunately, it didn’t create any lasting damage. Daniel says witnessing the failure cemented his understanding of the forces at play, and he now puts that understanding to good use for clients.
LEARN FROM THE RAIN
When it’s raining, get out in it. Observation of your land when rain is falling can be your best teacher. “Every time we’d get a really big rain, I’d put on my coat, grab my camera and walk around all my water structures to see how they were coping,” says Daniel.
These days, he’s confident about the lessons learned and can stay dry at home during storms.
FILL VS ORIGINAL GROUND
Fill is often subsoil, removed, and placed somewhere else to change the level of a landscape, usually to level a site or build a mound. Dispersing water into fill is extremely risky. It’s best to direct overflow onto original ground with established vegetative cover. Long grass is perfect.
WHY IT’S IMPORTANT TO COVER-UP QUICK
Plant out into the soil exposed by a digger as soon as possible. Bare soil will quickly dry out and be lost to wind or eroded by rain. Grass or clover will generally establish in spring or autumn if there is at least 100mm of topsoil or even loose subsoil. Hydro-seeding is a good option, but you’ll need to hire contractors to pressure-spray the mix of water, seed, fertiliser, and paper mulch.
It works well under ideal conditions, such as immaculately prepared ground at a new suburban subdivision. It can be more difficult on a block. Hydroseeding was a complete failure at block owner Hazel Kidner’s property. “All we did was feed the birds that autumn,” she says.
A rock face on batters either side of Daniel and Bena’s driveway. It’s part of earthworks that slow down and disperse water that runs off the road.
If it’s too dry or too cold to seed grasses, covering the soil with rotten hay is a good option, says GreenBridge co-director Bena Denton. “You want to get those cuts covered as soon as possible.”
The hardest places to establish cover are the steep batters above tracks or building sites, which usually cut into the subsoil. For smaller areas where aesthetics matter, a batter can be faced with rock, as Bena and Daniel did on their driveway (pictured above). Around house sites, digger operator David Bunn suggests creating a terrace halfway up a big batter.
Climbing fig (Ficus pumila).
“That will stop the water hooning down the batter when it rains. I prefer to go further back into the hillside (to create a shallower gradient). It needs to be possible to walk on the batter.”
It’s also easier to establish trees or plants on a terrace and creates a level path for access.
Use climbing, hanging or prostrate plants when re-establishing cover on steep faces. Bena has been experimenting with climbing fig, Ficus pumila. It roots at nodes and exudes a sticky substance that helps it cling to surfaces. It’s slow to spread, but thorough.
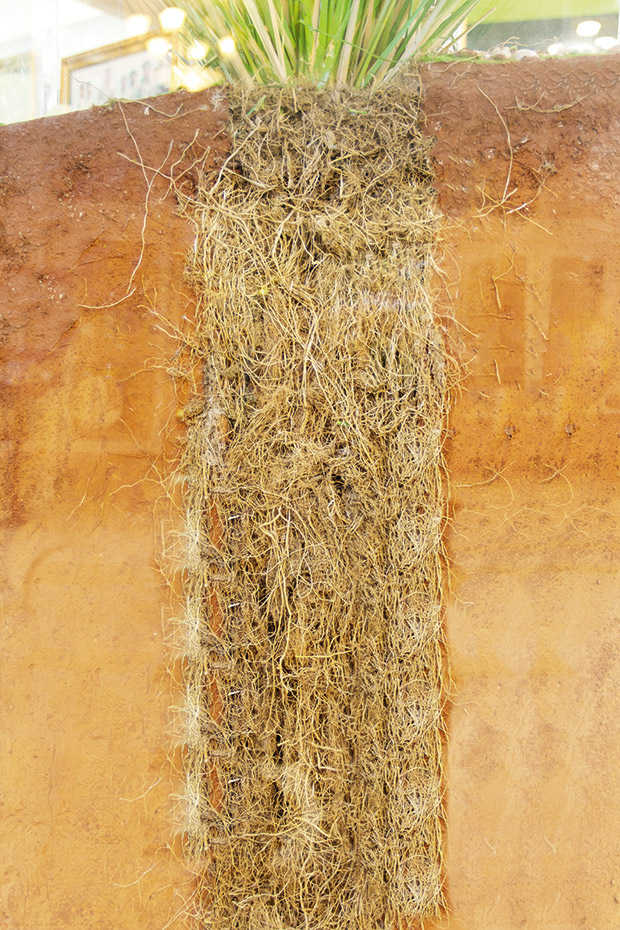
The thick, deep roots of vetiver.
“I pick a spot where it will be bordered by a path or some other barrier to halt its roots,” says Bena.
Native Tecomanthe speciosa is another option. Once critically endangered, it’s now widely available. Use in the right place, advises Bena, not where it can scramble over buildings or climb trees. She’s also trialling NZ jasmine (Parsonsia heterophylla) and cascading coprosmas.
Vetiver is another alternative, a non-invasive Indian grass with incredible soil-holding capacity. Its fibrous roots can penetrate 5-6m in almost any soil. Plant between September and March (it’s drought-resistant) but order early as vetiver plants tend to sell out quickly.
DIY EARTHWORKS
Can you do your own digger work? Should you? It depends, says contractor Cody Hooper. An inexperienced operator can get into what Cody calls a “power of trouble”, especially if slopes or slippery ground is involved.
It took three and a half hours to extricate this stricken digger (pictured at right) after it got stuck while a farmer was trying to restore a culvert. His bulldozer also got stuck in the first rescue attempt. Fortunately, the farmer was unhurt. Cody was working on a neighbouring property and came to the rescue with his machine.
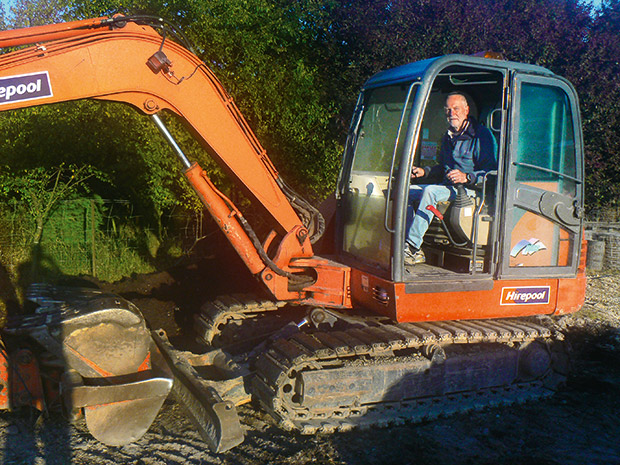
Timaru block owner Phil Driver at the controls of a hired digger.
Doing your own earthmoving can be an option in the right circumstances. Timaru block owner Phil Driver did a week-long, hands-on course to learn the basics of managing an excavator. He then used small diggers to landscape and put in a driveway on his 5000m² block. Phil loved it so much he says his jaw ached at the end of the day from grinning so much.
“Doing (it yourself) means you can change your ideas as you go along. That’s proved really valuable, as things so often look different once you’ve moved the dirt around a bit.”
Phil later hired a 5-tonne digger and excavated the foundations for his new house, under the supervision of a licensed building practitioner.
Most hire companies have excavators available, and the smallest can be transported by trailer. Diggers from five tonnes will generally involve a cartage fee to get on site. If you want swales, you can dig them by hand, which is cheaper. As with mechanised earthmoving, do it when soil moisture is at the right level, and when you can get quickly establish cover plants over the bare earth.
Pro tip: If using earthmoving machines, plan ahead for where topsoil will be stored during excavation and how you can best use it at the end of your project.
WATCH EARTHWORKS IN ACTION
In this video by Australian permaculture consultant and teacher Geoff Lawton, you can see the aftermath of Cyclone Debbie on his property. Note the water-calming effects of level spillways, the built-in redundancy (a second spillway gets called into service), and how erosion is prevented by spilling water over original ground covered in tall grass.
MORE HERE
Earthworks 101: A stress-free guide to transforming your property with a digger
