Nicola Galloway: Time to sprout
With fresh produce prices higher than ever, is it time to return to good old sprouting?
If you have a garden, growing greens and herbs is one way to have some fresh affordable produce on hand. But this isn’t always practical, or even a possibility for all.
Sprouting, popularised in the healthy eating diets of the 70’s and 80’s, is something we can all do. You don’t need a fancy set-up, although there are sprouting gadgets available, one of which I now use myself (more about this below). Sprouting is economical, with a small number of dried legumes or seeds producing a decent quantity of fresh nutritious sprouts.
Fresh sprouts are easy to prepare. Possibly the trickiest part is remembering to rinse them regularly (hint: keep them beside the sink). There may also be some people who have had a bad experience with sprouts (hands up over here). There was a time in my early years (the 80’s) when my health-conscious parents went through a serious sprouting stage: sprouting every seed they possibly could and using them in everything. It took me a long time to appreciate sprouts again.
I have since discovered that some sprouts make better eating than others. Finding the ones you enjoy most is important. For my eaters, this includes mung bean sprouts, and a sprouting mix of mustard, broccoli, fenugreek, fennel and chia seeds. I like the seed mixes as they bring interesting flavours, while not quite as ubiquitous as alfalfa sprouts.
If you are new to sprouting, start small by trying one type of sprout at a time to find what you enjoy eating. Also be aware that not all seeds will sprout, in particular some imported seeds are heat treated and won’t sprout. A bulk food or organic store is the best place to source sproutable seeds. If the store can’t guarantee they are not heat treated then treat them as if they are. Heat-treated seeds simply won’t sprout no matter how long you leave them. The heat has rendered them sterile so they don’t have the ability to come back to life.
How to sprout
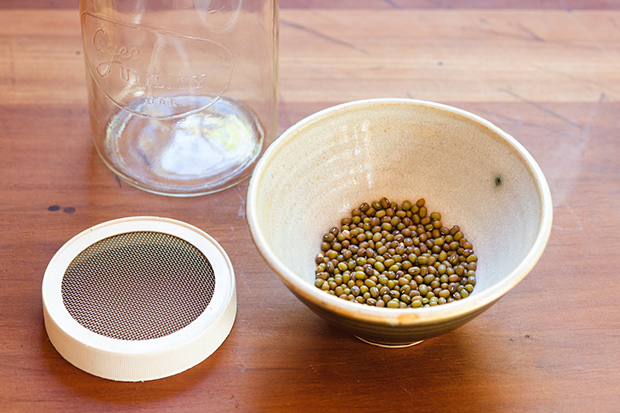
SET UP:
There are several options for setting up a sprouting station. A glass jar with a mesh sprouting lid is the most popular setup. Sprouting lids (and jar if you haven’t got one to fit) can be purchased online or from the same store as the sprouting seeds. For an even simpler (no cost) setup, sprouts can be rinsed in a sieve and set over a bowl to drain. If using this option, cover with a plate or tea towel.
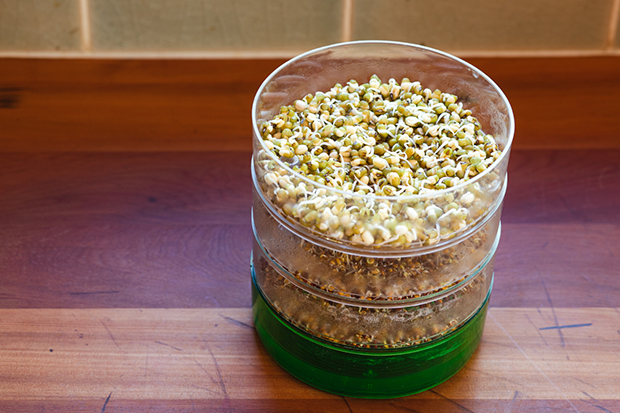
Then there are more complex gadgets. I was given a sprouting ‘tower’ a few years back as a birthday gift. It is composed of stacked trays that drain from one to another with the rinsing water collecting in the bottom tray. At the time I wasn’t quite sure about it (or if I really needed another kitchen gadget), but I can confirm I have grown to enjoy having it as part of my kitchen and use it often.
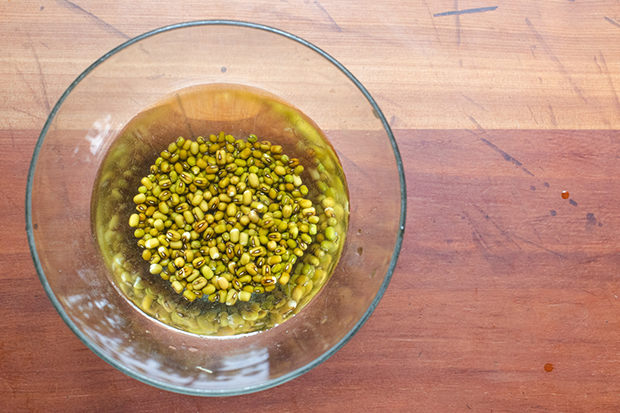
SOAK THE LEGUMES/SEEDS:
Whatever the setup used, the first step is to pre-soak the legumes or seeds. To yield around 1 cup of sprouts, measure ¼ – ⅓ cup of larger legumes or seeds such as mung beans, chickpeas or sunflower seeds, or 2-3 tablespoons of smaller seeds such as mustard, broccoli, fenugreek, fennel, chia and alfalfa. Place the seeds into a small bowl or sprouting jar and cover with cold water. Leave to soak for 4-8 hours or overnight (longer for larger legumes such as chickpeas).
RINSE REGULARLY:
Drain and rinse the soaked seeds in the sprouting jar or a sieve. If using a jar with a mesh lid invert it in a bowl set on a slight angle so the excess water can drain out. For a sprouting tower, drain the seeds and spread in a single layer in the trays.
Rinse and drain the seeds twice a day (more often in hot weather) until they begin to sprout and grow a tail. This will take 2-4 days depending on the time of year and the size of the seeds. For legumes such as mung beans, they’re ready once the tail is 2-3 times the length of the bean. Smaller seeds such as alfalfa can have longer tails about 3 cm long.
STORING AND USING:
Once the sprouts are ready, give them one more rinse and drain well. Store in the fridge in either the sprouting jar with a sealable lid or a lidded container. Use fresh sprouts within 5 days. Larger sprouts can be added to salads, stir-fries, curries, soups and more. Alfalfa-like sprouts can be used in sandwiches, wraps, or my favourite, served on toast with feta and a drizzle of olive oil.
Nicola Galloway is an award-winning food writer, cookbook author and culinary tutor. Find more seasonal recipes on her website – www.homegrown-kitchen.co.nz